• Home
  • /
  • Tag Archives:  travertine
TRAVERTINE PAVERS INSTALLATION

TRAVERTINE PAVERS INSTALLATION

TRAVERTINE PAVERS INSTALLATION

TRAVERTINE PAVERS INSTALLATION

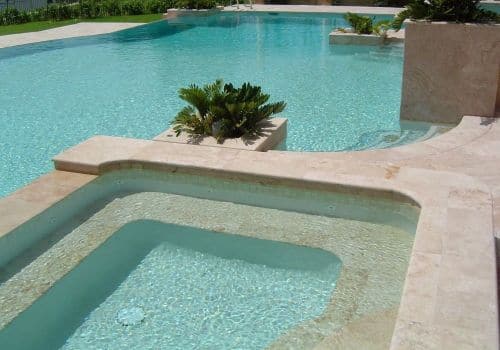
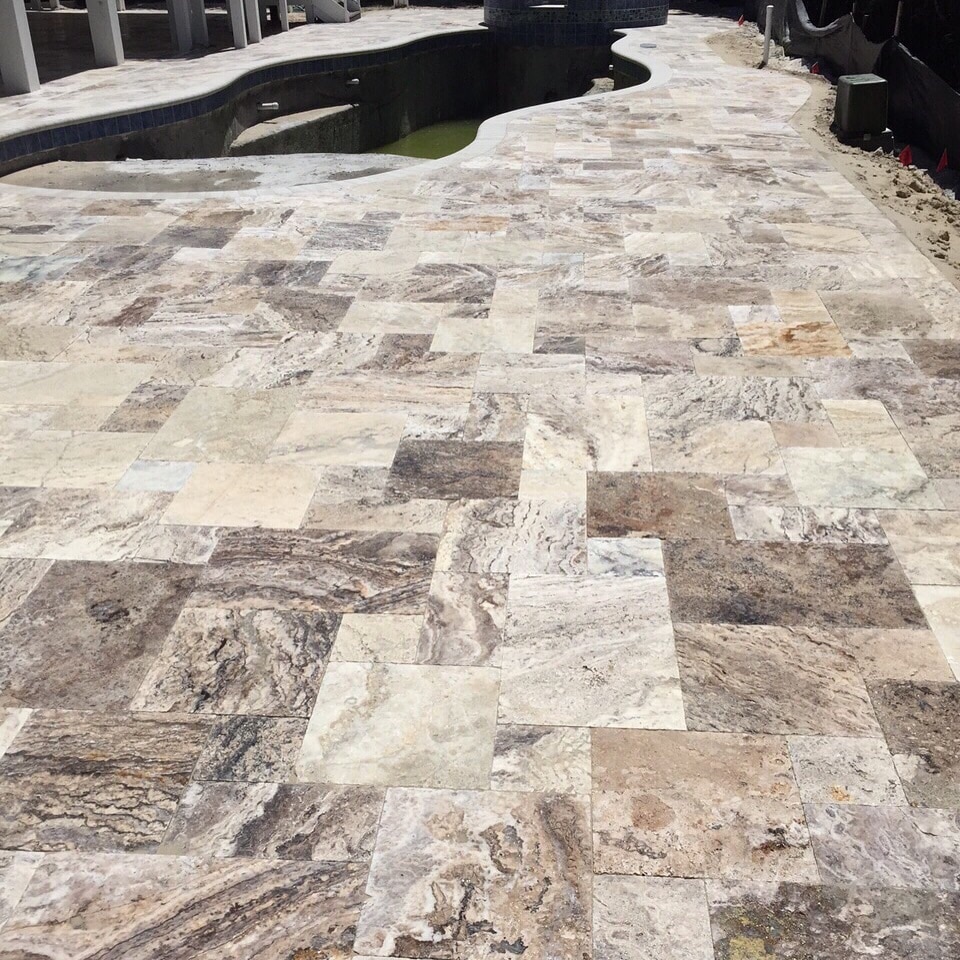
Stone Tile Us pavers are available in Marble and Travertine with finishes: tumbled, honed and filled. The finish on these stones are good for traction of vehicles and walking. The dense, hard material of travertine pavers makes them good for driveways, patios, pool and decks. They are resistant to moisture, cold, heat and erosion.  There is no heat retention and its surface remains cool to the touch. We offer a good variety of colors and sizes to blend with your outdoor design.

Surface Preparation (Important)

Travertine pavers are durable, however, they are breakable so it’s important to properly prepare the surface. Pavers sized 6×12 are best for driveway to prevent cracking from the pressure of vehicles. Larger sizes, and French Pattern, are good for outdoor, deck and pool areas but not recommended for driveway use.

TRAVERTINE PAVERS INSTALLATION STEPS:

Dry-Set

Is highly recommended it is easy to lay and replace if needed and is the best option for cold weather.

Steps:

Excavate if needed

Compact (Soil has to have the correct moisture level)

Level, compact and repeat

Add 6” to 8” crushed limestone (sharp edges assist a snug fit) allows for good drainage.

Compact layers

Add the limestone in 2 -3 layers

Level compact and repeat

Top with ½” sand

Then lay pavers

Clearly define borders 6×12 Travertine Pavers

After pavers are in place Polymeric sand can be swept between cracks, grout, or they can be left alone

TRAVERTINE PAVERS INSTALLATION Mud-set

Uniform ground, surface/platform.

Excavate 6″ to 8″ of soil

Clear the area and create a level platform

Use a plate compactor to compact the soil

Fill area with crushed gravel (limestone base 3” to 4”)

Pour 4” concrete slab

Add mortar and lay the travertine pavers

Start from the edge of the driveway and work your way inwards.

Flexbond is recommended for cold weather mud set travertine paver installation that will be mud-set on top of a concrete surface.

It allows contraction and expansion during the extreme cold weather cycle as  will as prevent cracking.

TRAVERTINE PAVERS INSTALLATION Sand set

Excavate the area and compact the soil.

Add a crushed limestone base 4” to 5”

Crushed limestone is a sure foundation, and will help the pavers stay in proper position while allowing proper drainage.

Add 1” to 2” of concrete sand over crushed limestone.

Lay pavers starting from the edge of the driveway and work your way in (use something like a concrete slab, to hold pavers in position during installation).

Pavers should be placed in a fitted pattern for good snug fit.

Fill the joints in with polymeric sand (usually a mix of sand & special additives that are used for filling paving stone joints).

Edging

It’s recommended to install landscape edging on the outside edge of the pavers this will keep them from shifting out of position (top of the edging must be level with the travertine paver edge)

An alternative is pouring concrete along the outside edge after tiles are set (top of the edging must be level with the travertine paver edge)

Finishes

Your outdoor travertine paver finish options are:

Tumbled finish, has textured, porous finish that is skid-resistant.

Honed is a smoother finish than tumbled  but still has needed traction when wet.

Polished finish is smooth and should only be installed in covered outside areas porch patio etc…

TRAVERTINE PAVERS INSTALLATION Patterns

The pattern is up to you as there are several pattern/size options:

6×12, 8×8, 8×16, 12×12, 12×24, 16×16, 16×24, & 24×24

French pattern/mini-French pattern

Pattern repeats after the first square ends (tiles are 16″ by 24″, 16″ by 16″, 16″ by 8″ & 8″by 8″ pavers and is set to cover 16 sq. ft. area. You should place tiles close together and you should fill the joints with sand).

When pavers are set, check for level, go over the area with a plate compactor again.

Stone Tile Us ships everywhere and fast, check or flooring tile shipping policy. 

Check our latest natural stone projects to help you visualize yours.

If you need more information about our natural stone selection, give us a call today 855-344-8716.

CLEANING TILE

CLEANING TILE

CLEANING TILE

CLEANING TILE

It is never advisable to use any harsh cleaning chemicals on natural stones as the stain can become worse or set on the tile.

Keep the natural stone tiles clean, by using a dry, clean dust mop-for your CLEANING TILE.

Do not use any abrasive chemicals or a vacuum cleaner as those may stain and/or scratch the surface of the tile.

StoneTech Professional Revitalizer Cleaner and Protector by DuPont is one of the suggested cleaners for your natural stone.

Pressure washing is sometimes needed for deep cleaning from tree and plant debris or in areas that collect a lot of water and get stained.

If you have a salt water pool, your pavers will need to be sealed with a water-repellent salt water sealer, and it’s better if applied before installing, to ensure that the entire paver is protected and not just the surface.

Here are a few products that can be used for Natural Stone cleaning:
KlenzAll heavy duty alkaline cleaner and degreaser
Oil and Stain Remover
Revitalizer cleaner & protector
BulletProof – sealer
Impregnator pro – sealer

TILE CLEANING 

STAINS

Natural stones such as travertine, marble, granite, etc. are porous materials which means they are absorbent making them prone to stains.  At the same time, that characteristic also means that stains can be easily removed.  When you notice a stain, clean it as soon as possible for better results.

All you need to do is to “lift” the stain by using a product called Stone Pro Deep Clean Gel which is sold at retail stores.

If that fails, it means that the stain is embedded in your tile.  In that case, you can use Stone Pro Wet Poultice Stain Remover that is a ready-to-use paste which does not requires mixing or measuring.

You can purchase both items at this store:  http://www.mystonecare.com/Stone-Problem-Solvers-Tile-Problem-Solvers-s/19.htm

TILE CLEANING 

SEALING YOUR STONE

This is a personal choice.  However, by using a sealer, your natural stone products are better protected against stains and dirt.

There are several kinds of sealers in the market.  When selecting one, make sure it is the correct one for the kind of tile you purchased.  We recommend the following brand:  http://miraclesealants.com/

The best person to help you make that decision is your installer.  Make sure to ask him for recommendations.

Advantage of paver sealant:

Protect outdoor stone against stains from tree and plant debris or in areas that collect a lot of water and get stained and mildew.

The sealer is deep penetrating and preserving of the stone’s natural surface texture while keeping stains and mildew out.

Sealer will also reduce damage that can be caused by spills from things that can stain like wine.

Disadvantages of sealing pavers:

Recommended 5 year re application of a professional sealer. It may even be yearly according to the brands manufacture instructions that you choose.

If you’re a DYI person you can actually get it done for a fraction of the cost.

Seal Pavers-needed are:

White clean cloth-absorbent suggested

Clean your Pavers

Apply the Sealer

Apply Finishing

Remove Excess and re apply

Travertine Pool Coping Quick Guide

Travertine Pool Coping Quick Guide

Travertine Pool Coping Quick Guide

Travertine Pool Coping Quick Guide

Pool Copings are perfect to use around the pool area, at Stone Tile Us we offer copings in travertine and marble with sizes ranging from: 4×9, 6×12, 12×12, 12×24 to 16×14.
They match beautifully with our pavers for a professional finish! Pool coping in natural stone comes with the convenience of high quality and easy installation. They have a tumbled surface, and this makes them ideal for pool edging and stair treads.
Guide:
Choose coping based on the size and shape of your pool
Straight edge pools use: 12”x12” and 12”x24”
Semicircle and rounded pools use: 4”x8” and 6”x12”
Lay it in a pattern that will be a perfect fit for your pools shape
A diamond blade saw can be used to cut pavers to your desired shape (sand the edges if cutting was needed)
1” mortar with flexBond to complete the process

Travertine Pool Coping Quick Guide

TIP:
We offer paves to match your coping for a great visual, professional, polished finish. Why not purchase matching pavers?!

Copings: Pool coping is a frame around the pool and It separates the decking from the pool structure think of a picture frame.
They are perfect to use around the pool area , Stone Tile Us pool copings are travertine and marble.

Travertine Pool Coping Quick Guide

USES
Pool edging and stair treads
Options are natural stone, poured in place concrete, pre-cast concrete material, and tile.
Stone tile Us has a variety of sizes our newest is 2″.

FINISHES
Tumbled surface
Square corners may not always be appropriate or safe especially in the pool area.
So the rounded sides, act as an exposed edge and protector making it safer.

Travertine Pool Coping Quick Guide

FACTS
Pool Coping in natural stone comes with the convenience of high quality and easy installation.
Part of the pool above the inside tile covering the top of the pool is called the bond beam typically 12“ width.
The pool coping separates the pool from the pool deck.

Stone Tile Us ships everywhere and fast, check or flooring tile shipping policy. 

Check our latest natural stone projects to help you visualize yours.

If you need more information about our natural stone selection, give us a call today 855-344-8716.

Back Splash Tile Installation

Back Splash Tile Installation

Back Splash Tile Installation

Back Splash Tile Installation

See our previous blog for a list of materials and tips

1. Make sure the wall surface has a sound structure (Good dry wall etc..)

2.The wall should be clean and flat (It’s been suggested to sandpaper or paint over the walls primer or sealer)

3.Measure to see how much tile you’ll need and get some extra from the same lot number.

4. Tiles purchased on sheets will allow for faster installation as you’ll be laying several at a time.

5. Cut tiles with a wet saw according to your needed measurements.

6. Lay tiles on the counter to get an idea of the layout pattern you want. (Cut tiles to size if needed).

7. Turn off power and remove wall face plates.

8. Apply Mastic (adhesive) with a notched trowel. Add to the walls with the flat side of the trowel.

9. Start at the center and work your way up horizontally. (Only apply to a 3×3 foot area at a time to prevent drying).

10. Double back over the application of adhesive with the notched side of the trowel to remove excess.  (Use a small trowel for small areas and tight corners).

Back Splash Tile Installation

11. Apply adhesive to the back of the tiles then lay them on the wall, starting at the base of the counter tops and working your way up.

This method will give you a straight edge guide and allows needed cuts/angles to be made under cabinets and exhaust fans.

12.Gently tap tiles into place with a mallet. Continue to lay tiles in a row and remove any surface excess (Every few minutes check for proper alignment).

13.Remove spacers, wipe surface clean, and let the tiles set over night before grouting.

14.Mix grout according to manufactures instructions.

15.Apply grout in a diagonal pattern using a rubber float holding it at a 45-degree angle.

16.Fill the seams with grout and wipe off excess with a damp sponge once grout is firm.

17.After grout dries a haze will form which must be removed with a clean sponge.

18.Apply cork (not grout) at the boarder of the counter tops and wall edges to seal and prevent cracking.

19.Replace switches and wall plates you may need longer screws.

20. Back Splash Tile Installation is now complete as always get professional advice before starting your installation project

world of marble

World Of Marble

It’s a World Of Marble !

stone tile us carries a world of marble!  Visit our website, stone tile us so you can see all the different marble tiles we carry.  From an elegant white marble to the more classic beige marble.  We carry them all!

Marble is a very durable material.  It is very popular with home remodeling contractors as it gives your house a classic elegant look.  Even flip house expert, Vanilla Ice, has chosen our products for his DIY show, The Vanilla Ice Project.  You can see the pictures of our marble tiles used on his projects here.

123